Welcome back to another post in my blog series on the PnP Starter-kit. If you’ve found this post, it’s likely you already know what the PnP Starter Kit is. However, if you do not, I’ve written a quick starter post about it here. The PnP Starter Kit is an open source initiative that provides an end to end solution for provisioning pre-built sites, web parts, extensions, site designs and more in an Office 365 environment.
Today we’ll be talking about the Tiles web part (highlighted in red)!

The Tiles web part is a grid of links that can be customized using the out of the box page editing experience. This web part allows you to customize which icon to load, the size of the tiles and where the tiles link to. To start customizing, set the page in edit mode and edit the web part.

Icons
If you open up the properties, you will notice in the header a description that specifies how to change/add the icons to your tile. There is a link that brings you to the Office UI Fabric Icon page. This is important, but current limitation (feature?) of the Tiles web part is that you can only source icons from the Office Fabric Icon library.
One caveat you should be aware of as you navigate and start choosing icons, is that the Office UI Fabric site may be more up to date than the icons available in the SPFx solution. This is because the version of Office UI Fabric used in the SharePoint Framework is a little behind the current release of Office UI Fabric. If you select an icon and it doesn’t load, this would be why.
Configure the Tiles
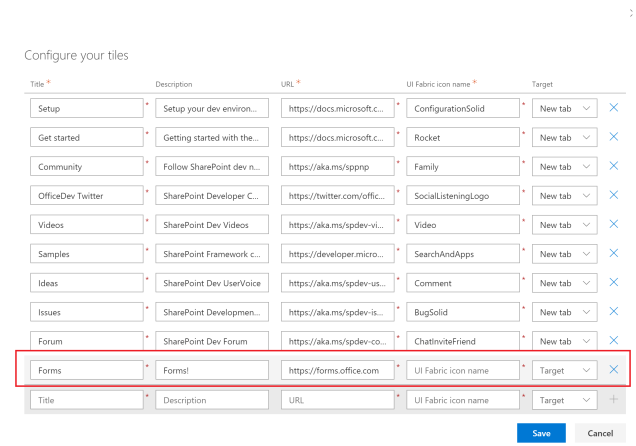
Unlike other implementations of tile links (promoted links for example), the Tiles web part isn’t list driven. What I mean by that, is in order to change the tiles and their links, you’ll have to actually open up and edit the web part every time. While it is a different editing experience, it actually has some real sweet under the covers. When you click “Configure the Tiles”, you’ll notice a new editing modal pop up.

This editing pane is a table that you can modify properties such as the Title, Description, URL, UI Fabric Icon and specify whether the link should load in the same window or a new tab.
What gets me excited most about this property pane, is that it is not built specifically for this web part. In fact, if you are building SPFx solutions and have a need for inserting complex data types of lists/collections, you can use this! The best part is that this control is included in the re-usable property pane controls repository here.
Create a new Link
Let’s say we are going to build a new Tile link which links to the Microsoft Forms web site. Let’s start by clicking “Configure the tiles” and adding a new record for our new link. We’ll put the title as “Forms” and specify the URL to https://forms.office.com
Next, we need to find an Icon to load into our tile. Let’s navigate to the UI Fabric website and find the icon for Microsoft Forms.

You’ll notice when you hover of the icon, it shows the name of the icon “OfficeFormsLogo”. This is actually the class name that UI Fabric uses to render icon. Let’s copy that value and we’ll paste it into our property pane for a new tile in the “UI Fabric icon name” field.

Now if you click “Add and Save”, you should see your new tile link!


Where is the website mentioned for the UI Fabric icons?
LikeLike
Nevermind, it’s actually in the dialog for the menu. https://developer.microsoft.com/en-us/fabric#/styles/icons
LikeLike